Per-Project Setup
INFO
This page contains instructions for creating your own personal repository for a project in this course, cloning it, and getting it set up inside your dev container. You will need to complete these steps once per project in this course, after completing the Student Environment setup.
Setup Instructions
Create a Repository From the Template
A template repository is a special kind of GitHub repository that lets you generate a brand new repository with the same starter files, folder structure, and history-free commit as the template, but under your own account. For each project in this course, course staff provide a template repository (e.g.: project-1-starter) containing the starter code, instructions, and configuration you'll need. Using the template feature ensures you get your own independent, private copy to work in, rather than modifying the shared template directly.
WARNING
Make sure you are signed in to GitHub with your own personal account before starting these steps.
DANGER
When you get to the Visibility setting below, do not select Public! Making your repository public exposes your work to other students (and the internet), which is an academic integrity violation. If you accidentally create a public repository, see the Common Issues section below to fix it immediately.
- Navigate to the starter template repository for the project you are starting (e.g.:
https://github.com/CSCI-442-Mines/PROJECT_NAME-starter, wherePROJECT_NAMEis the name of the project, such asproject-1). - Click the green
Use this templatebutton near the top right of the page, then selectCreate a new repositoryfrom the dropdown menu. - On the
Create a new repositorypage, fill out the following fields:- Owner: select your own personal GitHub account (not the
CSCI-442-Minesorganization). You will not have permission to create repositories directly under the organization. - Repository name: name your repository
PROJECT_NAME-USERNAME, wherePROJECT_NAMEis the name of the project (e.g.:project-1) andUSERNAMEis your GitHub username (e.g.:ghost). For example:project-1-ghost. - Visibility: select
Private.
- Owner: select your own personal GitHub account (not the
- Leave the remaining options (such as
Include all branches) at their default (unchecked) values. - Click the green
Create repositorybutton and wait for GitHub to finish generating your new repository from the template.
Find Your Repository URL
Once your repository has been created, you'll land on its main page. Click the green Code button, and copy either the HTTPS or SSH URL, depending on which authentication method you set up in the Setup Git Inside the Dev Container section.
TIP
Keep this URL handy! You'll use it as PROJECT_REPOSITORY_URL when cloning your repository below.
WARNING
Failure to follow the remaining instructions on this page exactly as presented may result in corrupting your source code!
Clone Your Repository
Now that you've created your repository from the template above, you need to clone it. This will create a copy of the starter code and instructions on your local machine. For best results clone the repository from inside the dev container using one of the following methods:
- (Recommended) Open VS Code, select
File > Open Recent: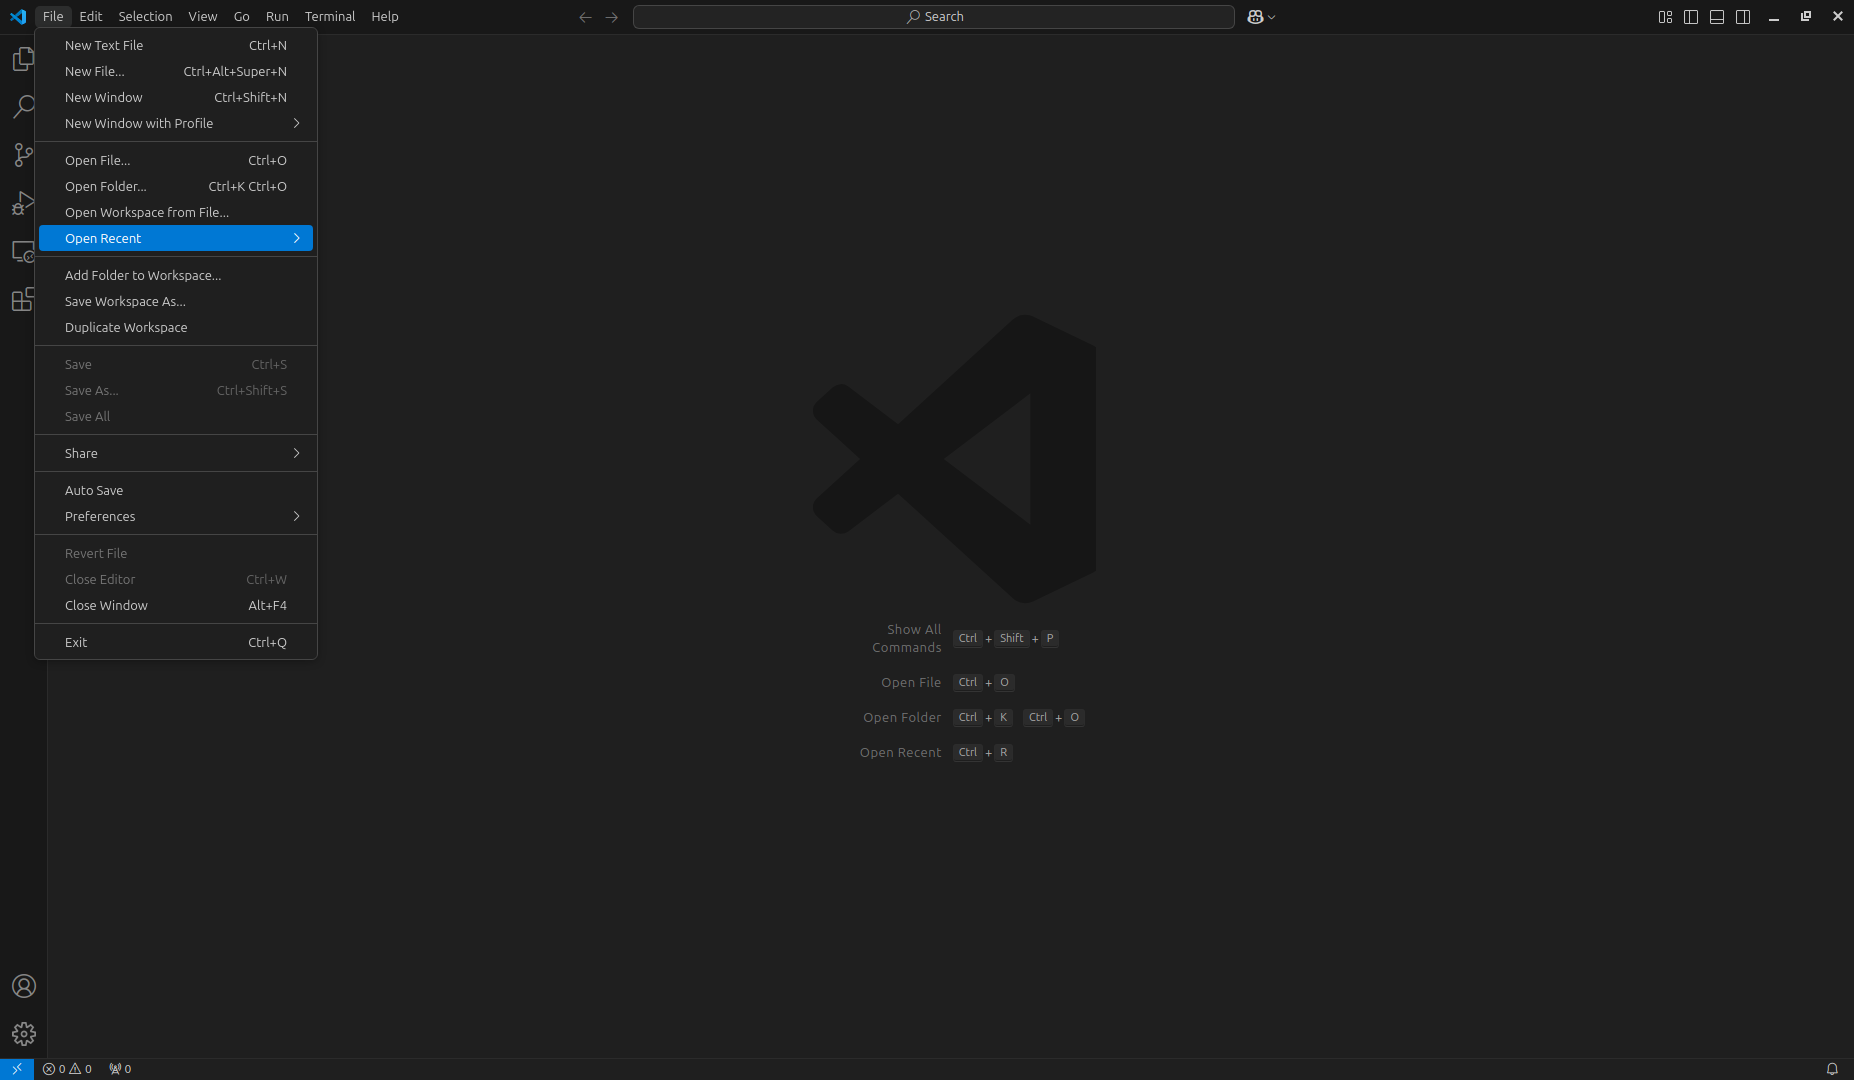 and then select the
 PATH_TO_DIRECTORY/student-env [Dev Container](WherePATH_TO_DIRECTORYis the actual path to the directory). Note that you must select the[Dev Container]entry! - Open VS Code, select
File > Open Folder..., navigate to the directory where you extracted the course dev container, and click onReopen in Containerpopup (the same way you did for setting up the course dev container).
Now that you've opened the dev container, open the top level of the workspace directory in the dev container by selecting File > Open Folder..., navigate to the /workspace/ directory, and click Ok:
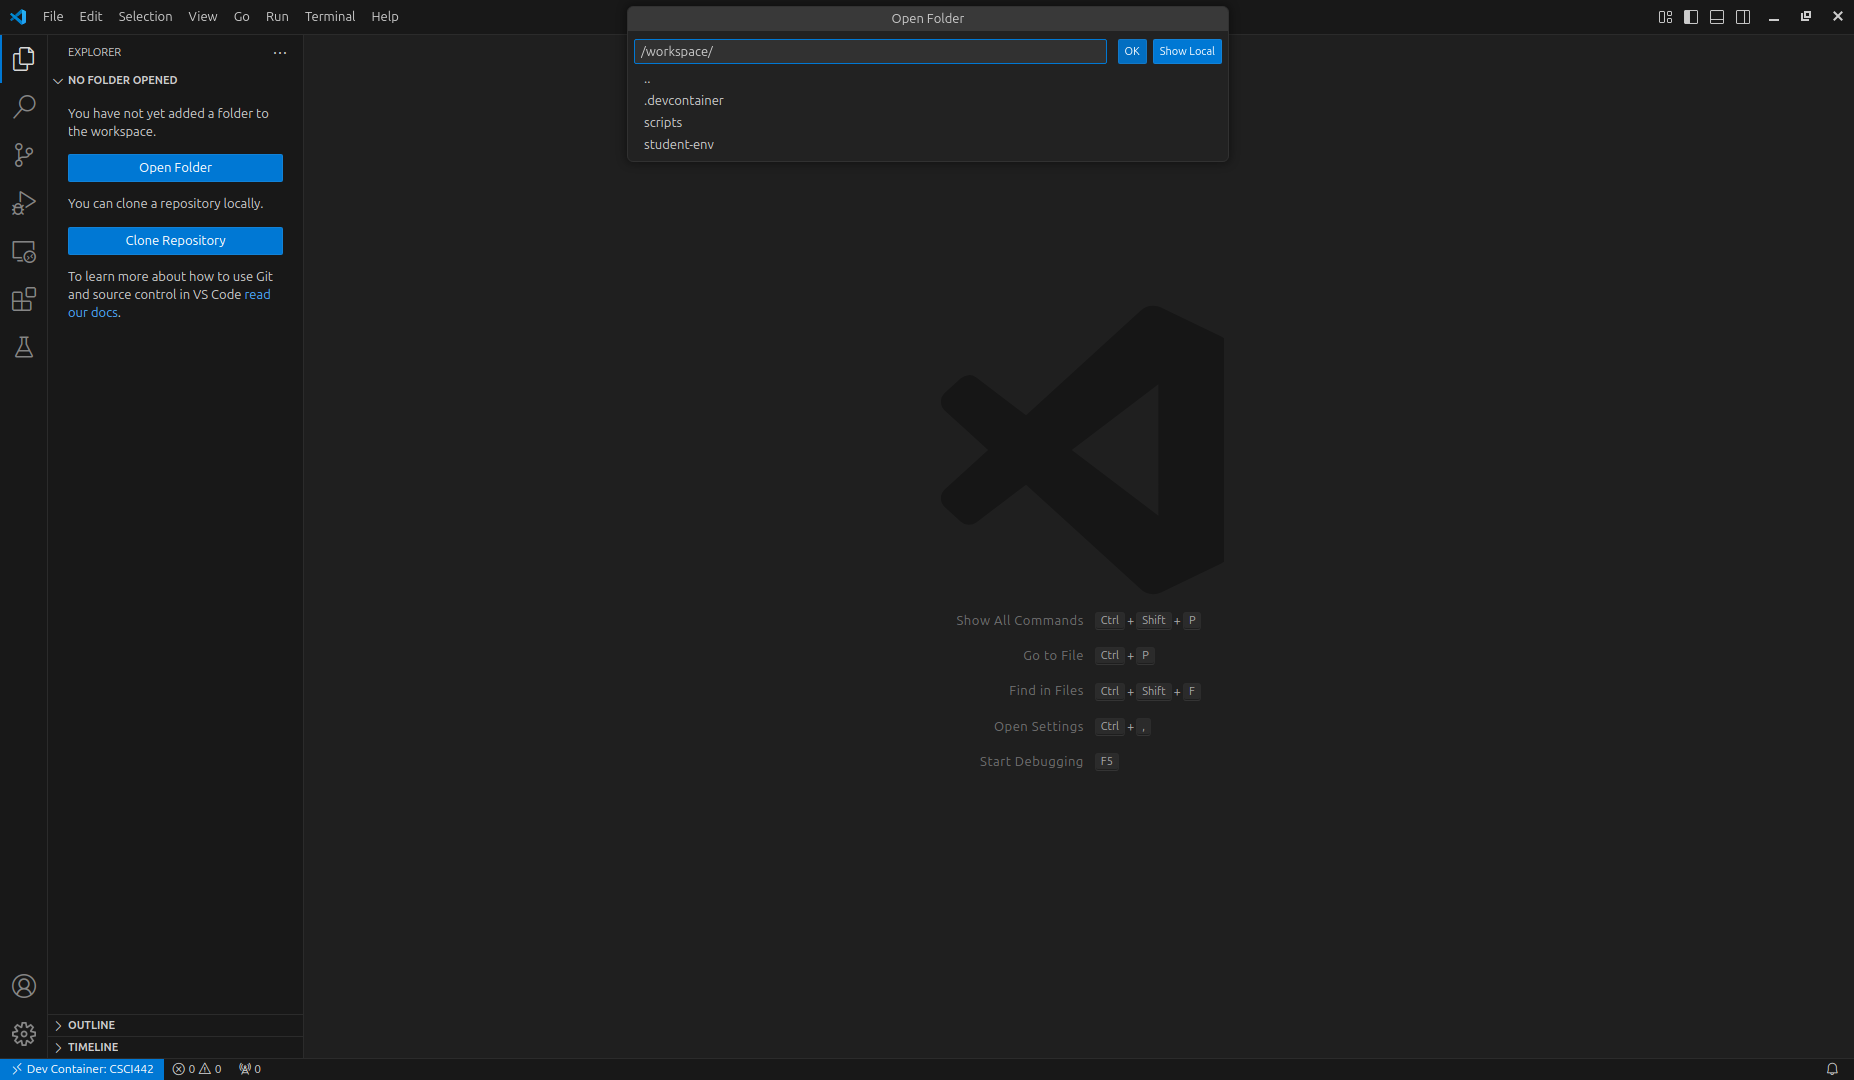
WARNING
If you skip this step (which must be done each time you set up a new project), you may end up cloning repositories inside of each other, which will cause issues when committing and pushing changes to GitHub.
Once VS Code has opened/changed to the /workspace/ directory, open the integrated terminal, and run the following command to clone your project repository:
git clone PROJECT_REPOSITORY_URLWhere PROJECT_REPOSITORY_URL is the URL of your own project repository (e.g.: https://github.com/USERNAME/project-1-USERNAME.git if using HTTPS, or git@github.com:USERNAME/project-1-USERNAME.git if using SSH, where USERNAME is your GitHub username). You can find this URL by following the Find Your Repository URL step above.
Once the repository is cloned, open the project-specific *.code-workspace file (e.g.: project-1.code-workspace) by clicking on it in the file explorer. You should see a popup notification, typically on the bottom right of the window, that says Open Workspace:
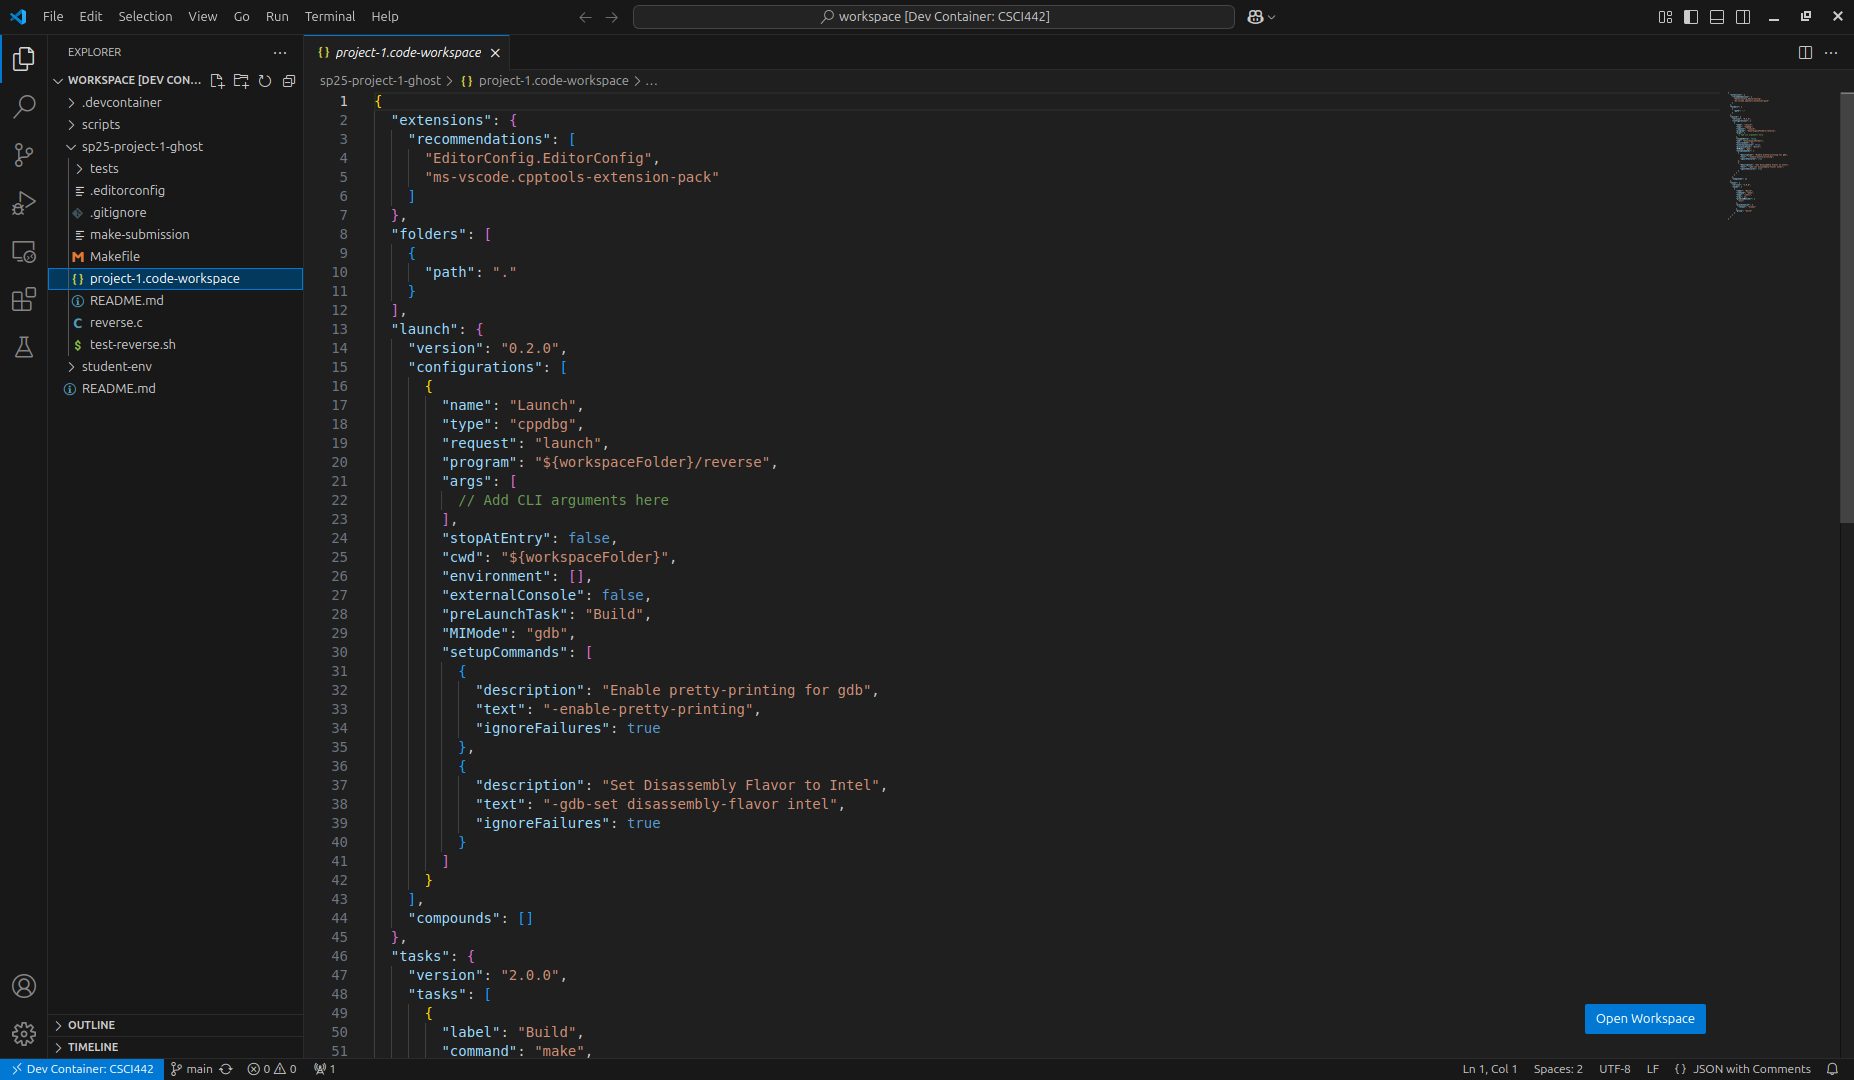
Click on Open Workspace to open the project-specific workspace (This will change VS Code's working directory to the project directory and load the project-specific settings). Once the workspace is open, you may get yet another notification asking if you would like to install the recommended extensions for the workspace:
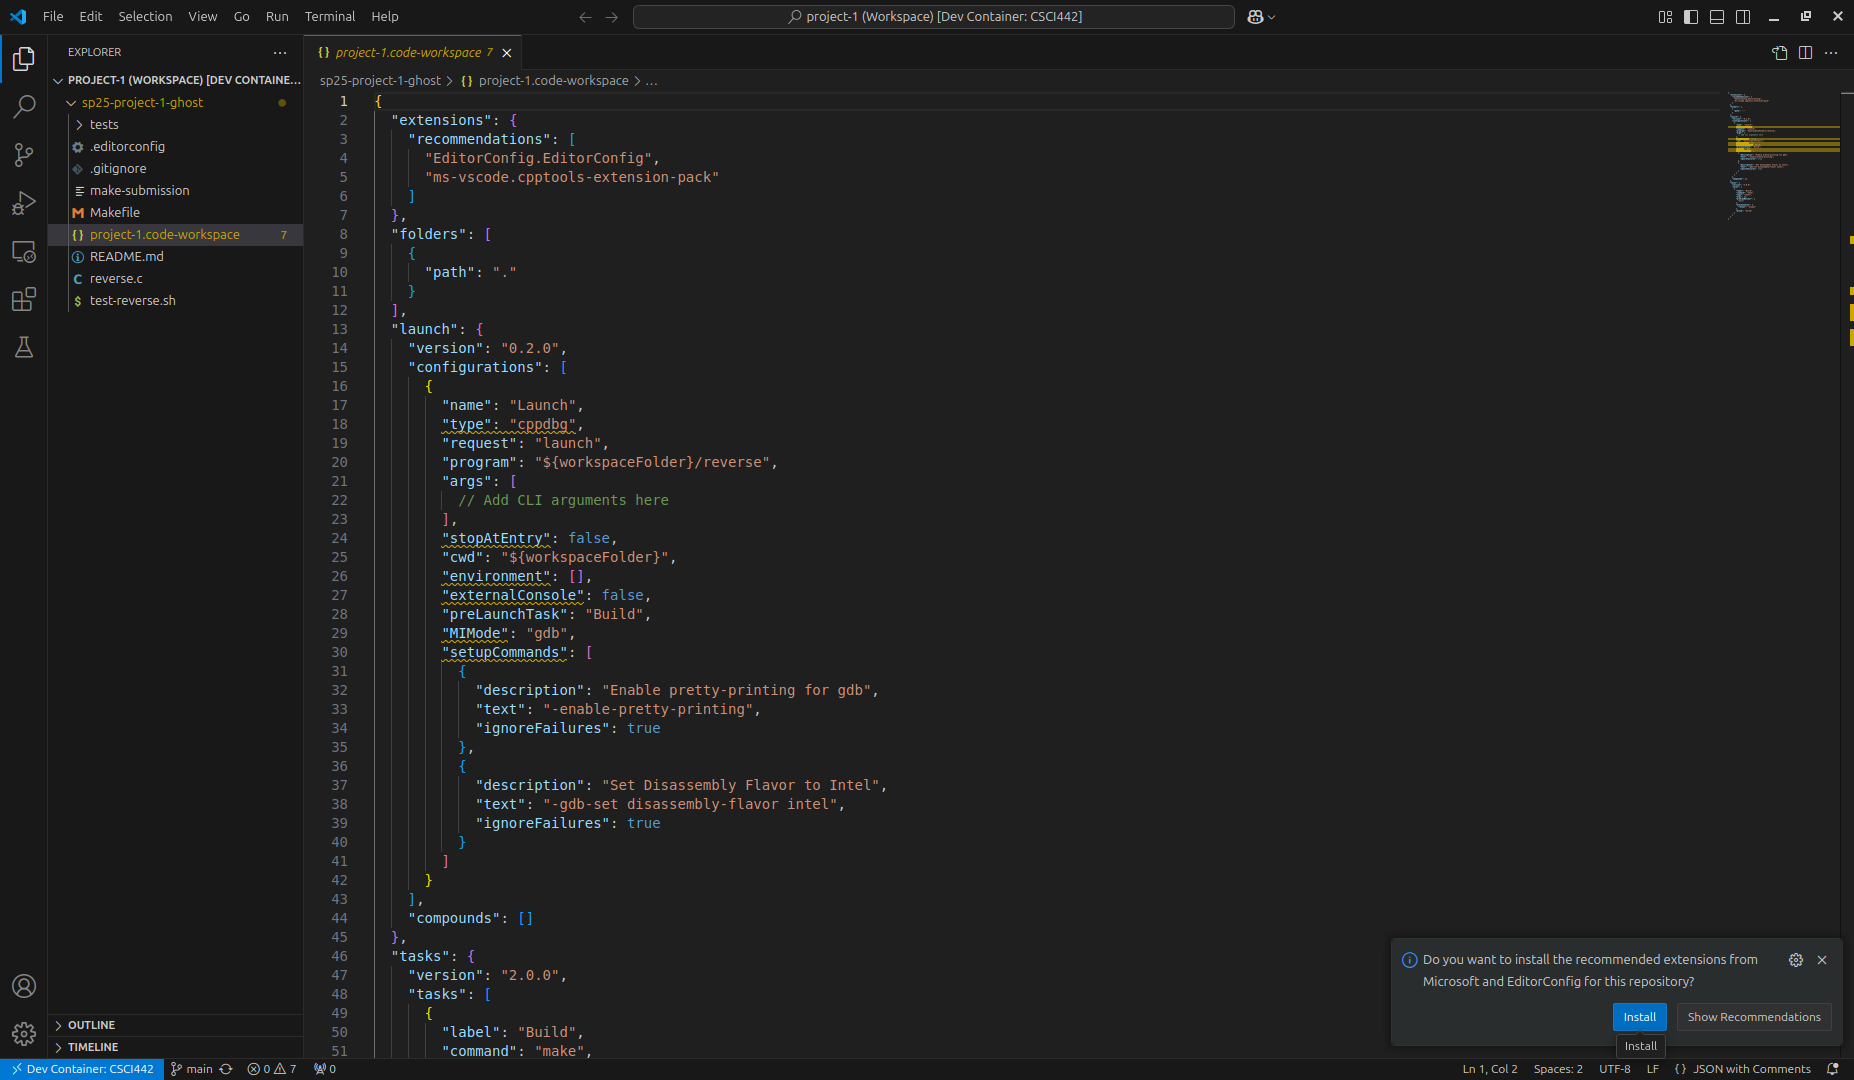
Click on Install to install the recommended extensions. Alternatively, you can install the recommended workspace extensions by pressing CTRL+SHIFT+P (or CMD+SHIFT+P on Mac) to open the command palette:
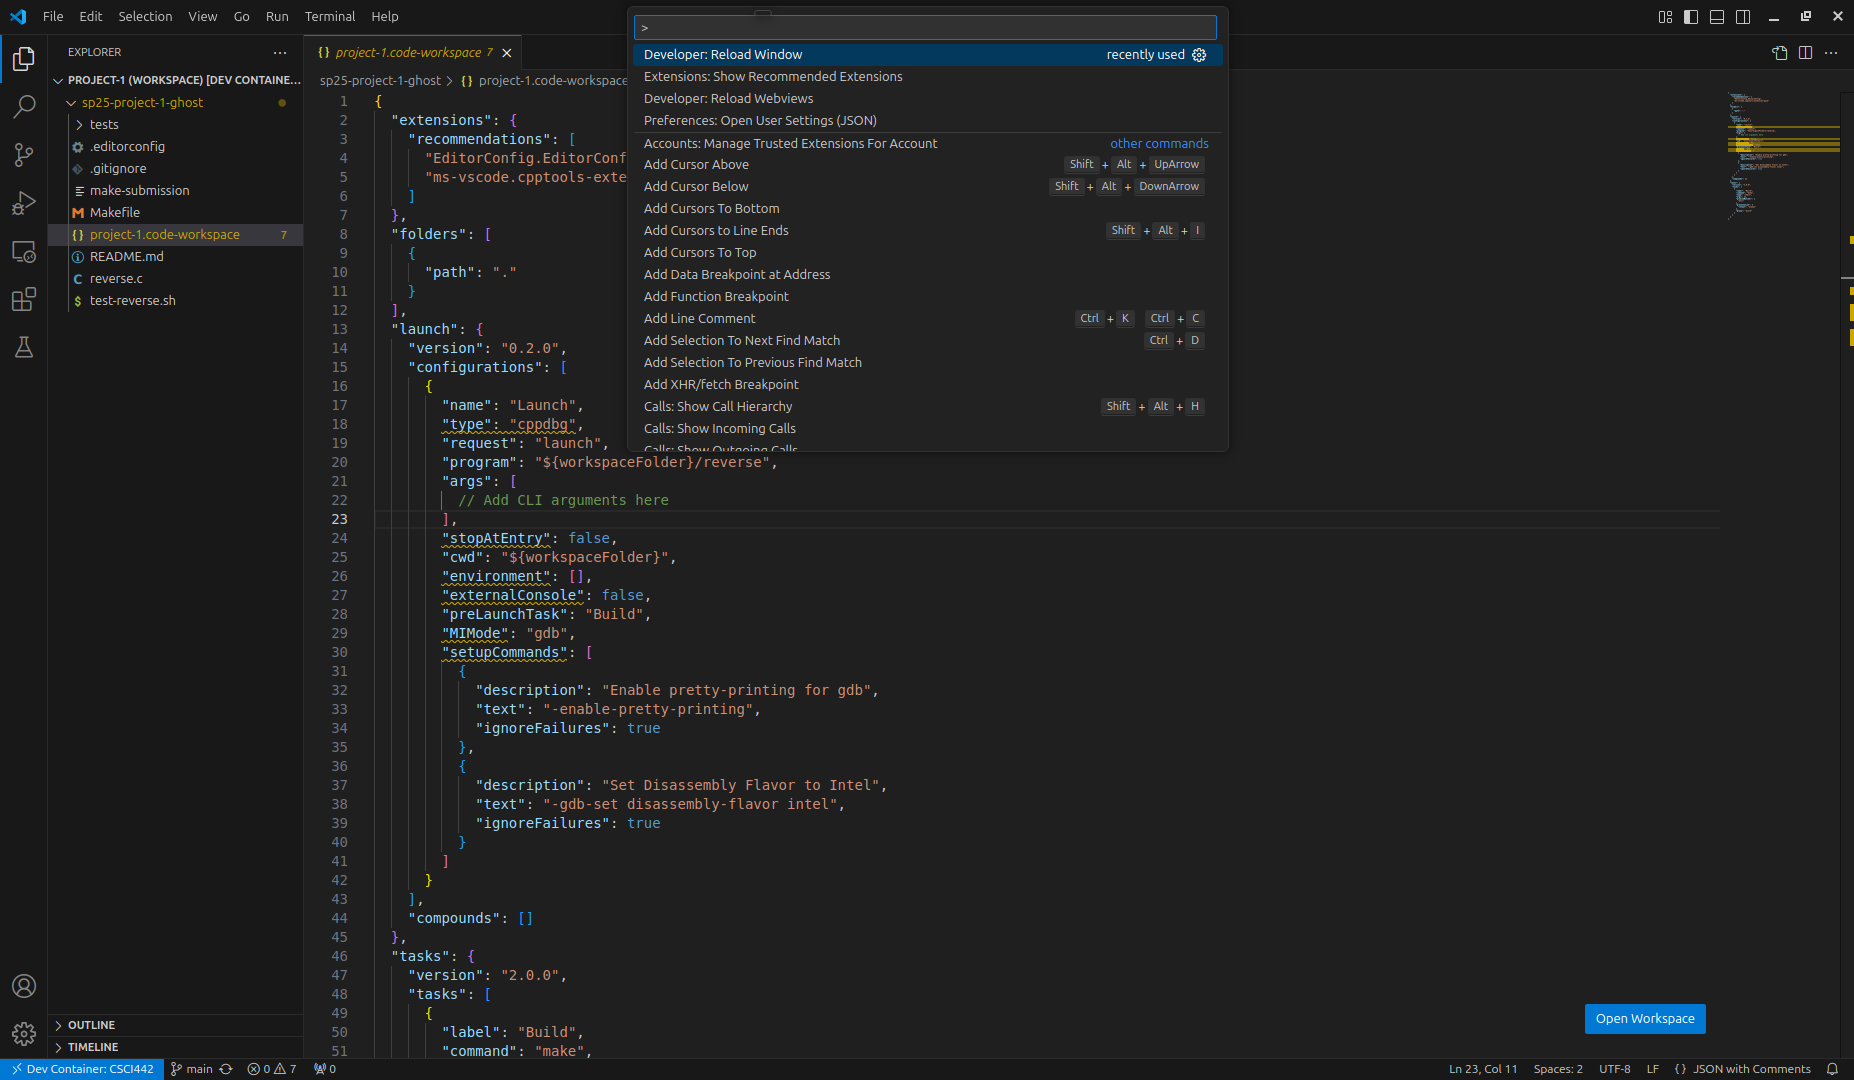
Then, type Extensions: Show Recommended Extensions, and press Enter. Then, click on the cloud icon with a down arrow to install all recommended extensions:
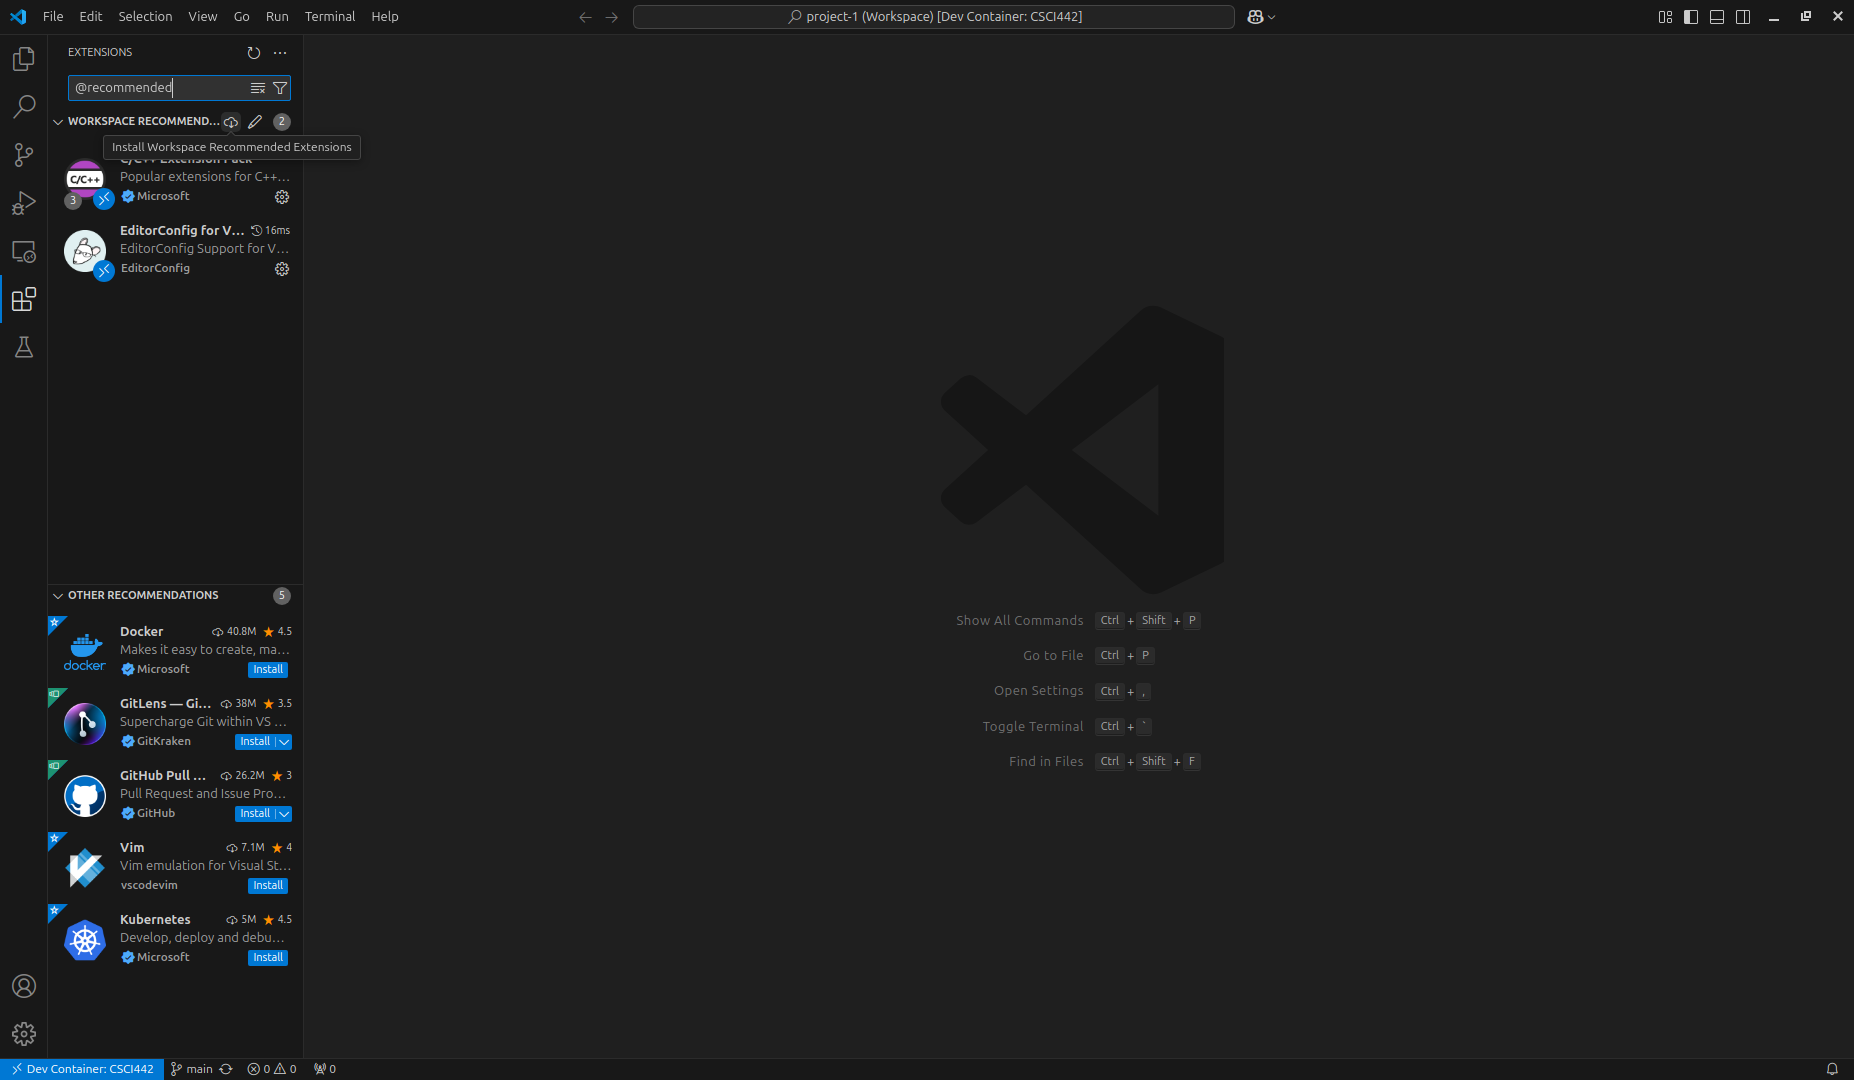
Once the extensions are installed, you can now start working on your project! Note that the *.code-workspace file (e.g.: project-1.code-workspace) we provide is pre-configured with everything you need for one-click building/debugging. You can find more information on how to use the workspace file in the each project's README.md file.
TIP
As you work on the project, remember to periodically commit and push your changes (e.g.: git add, git commit, and git push). Committing and pushing often protects your work in case something happens to your dev container, and gives you a history of checkpoints you can go back to if you need to.
Common Issues
Accidentally Created a Public Repository
- Symptom: you selected
Publicinstead ofPrivatewhen creating your repository (or forgot to check the visibility setting). - Solution: immediately go to your repository's
Settingstab, scroll to the bottomDanger Zonesection, and clickChange visibilityto switch it toPrivate.
Created the Repository Under the Wrong Owner
- Symptom: you selected the
CSCI-442-Minesorganization (or some other account) as theOwnerinstead of your personal account, and the creation failed or the repository ended up somewhere unexpected. - Solution: delete the incorrectly created repository (
Settings > Danger Zone > Delete this repository) and repeat the Create a Repository From the Template steps, making sure to select your personal account as theOwner.
Cloned or Forked the Template Instead of Using It
- Symptom: you ran
git clonedirectly on the template repository's URL, or used GitHub'sForkbutton instead ofUse this template, and now your repository is linked to (or a fork of) the shared template repository instead of being an independent copy. - Solution: delete the repository you created and repeat the Create a Repository From the Template steps, making sure to click the green
Use this templatebutton (notForkor the template repository's ownCodebutton).
Cloning Using HTTPS Instead of SSH
- Symptom: you receive an error message when cloning a repository similar to:
fatal: could not read Username for 'https://github.com': terminal prompts disabled
remote: Repository not found.- Solution: clone using the SSH URL (e.g.:
git@github.com:USERNAME/project-1-USERNAME.git) instead of the HTTPS URL (e.g.:https://github.com/USERNAME/project-1-USERNAME.git).
Cloning Using SSH Instead of HTTPS/SSH Key Not Set Up Correctly
- Symptom: you receive an error message when cloning a repository similar to:
git@github.com: Permission denied (publickey).
fatal: Could not read from remote repository.

Please make sure you have the correct access rights
and the repository exists.- Solution: if you are intending on using HTTPS, use the HTTPS URL (e.g.:
https://github.com/USERNAME/project-1-USERNAME.git). If you are intending on using SSH, make sure you set up your SSH key correctly by following the instructions in the Setup Git Inside the Dev Container section.
Can't Find The Project-Specific *.code-workspace File (e.g.: project-1.code-workspace)
- Symptom: you can't find the project-specific
*.code-workspacefile (e.g.:project-1.code-workspace) in VS Code's file explorer. - Solution: make sure you have opened the top level of the workspace directory in the dev container (See the Clone Your Repository section above for more details).
Missing Debug Configurations/Tools
- Symptom: the VS Code debug configurations and/or build/debug tools (e.g.:
clang,cmake,gcc,g++,make, etc.) are missing. - Solution: double check you have opened the course dev container first, and then opened the project-specific
*.code-workspacefile (e.g.:project-1.code-workspace) second. If you open the project-specific*.code-workspacefile (e.g.:project-1.code-workspace) without first opening the course dev container (or in different dev container), the debug configurations and/or tools will be missing.
This page created with the help of Claude AI.